Passbolt team
15 January, 2017
Groups (also called team management) is the must-have feature for most of passbolt users. It is the top priority of the roadmap and the next major product improvement. But before we start building, we need your feedback on the design!
The problem
At the moment, users need to be added one by one when sharing a password. Because there is no multiple-select functionality, it is quite time consuming. The groups feature will solve this problem.
Proposed approach
Administrators will be responsible of creating/deleting groups and assigning one or more group managers per group. Group managers will be responsible for adding/removing users to/from the group and sharing group passwords with new users. All users will be able to share passwords directly with a group, rather than with each user individually.

If you want more information about the approach rationale and the other options that we considered, please have a look at the specification document.
Wireframes
Password workspace

‘Shared with’ sidebar section
The only notable change in the password workspace is the “shared with” section of the sidebar when an item is selected, this section also shows which groups have access.

Share dialog
When sharing a password it is now possible to enter the name of a group and to define the level of privilege. The line below the user / group name will now show the latest operation done during the edit, a small but helpful improvement. The email, key fingerprint or group information will still be available by hovering over the “i” icon.

Share dialog autocomplete
When typing a name, both users and groups will be listed in the suggestion list. The label has been updated to “Share with people or groups” to reflect this.

Users workspace


‘Groups’ filters
We can now filter the users that belong to a certain group with the click of a button. When selecting a group the edit or/and delete button becomes active depending on the role. The breadcrumb also changes, and a sidebar containing group information is displayed.

‘Groups’ filter action menu
In the left sidebar the user can see a new section where all the groups are listed. The groups a user has the privileges to manage are marked with a dropdown button. This toggle triggers a contextual menu that allows interaction with the group.

‘Groups’ additional filters
A user may not want to see all the groups, but rather only the group they manage or only the group they are a member of.

Sidebar: group selected
When a group is selected in the filter section on the left side, the sidebar on the right displays information about the selected group. This prompts the user that this group is indeed selected and interacting with the edit and delete buttons will affect this particular group. This panel will show information about the group as well as list group members and provide a handy edit button.

Sidebar: user selected
Similar to the password entry, when a user record is selected in the user workspace, that users group memberships will be shown in the sidebar.

User edit dialog
A notable change in this dialog is the appearance of a groups tab. This allows the management of the groups a user belongs to. Admin users cannot add people to a group. Instead, they send an email request asking the group manager to add the user. This constraint is due to the security model of passbolt, you can learn more about it in the “approach rationale” section of the specifications.

Group create dialog
When creating a group, the group dialog is shown to the user. They can enter the group name and add group members before saving.


Group edit dialog
The group edit dialog is almost the same as the group create dialog, with just a few differences:
- As an admin, adding a new user means requesting the group manager to add it. The fact that it is only a request will be mentioned explicitly under the user name. This is due to the fact that the admin is not able to encrypt the secrets of to the newly added users (because of the security model, the admin do not have access to the group passwords).
- As a group manager, the group name field will be disabled. A group manager is not allowed to modify the group name. We’d like your opinion on this, see below for other open questions we have.
Group delete dialog
To prevent an administrator from removing a group by accident we show a confirmation dialog. Three cases are possible: if the group is the owner of some passwords we need to transfer the ownership to one group administrator. If the group does not have any passwords associated we display a different message than the case where some user will actually lose access.


Profile workspace
Group section
It is possible for a user to see which group they are a member of directly from their profile.

Open questions
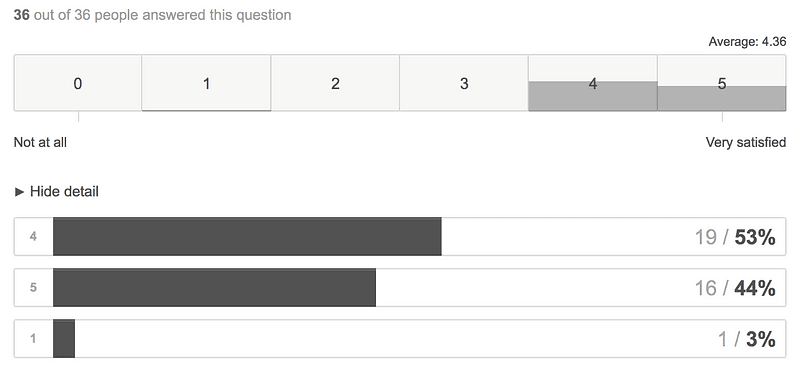
There are a few open questions on which we’d like to hear your opinion. Take the survey!
FAQ
Where are the user stories?
Glad you asked! We strongly believe in test driven development so you can find the user acceptance scenario the specification document. You are welcome to leave comments on it directly.
What are the next steps?
After validating these functional specifications with the community, it will be time to define the technical specifications. These will include:
- API endpoints: list and document all new endpoints.
- Sequence diagrams: high level sequence diagram explaining interaction between the different component, app js, plugin, API and the user.
- Data structure: Database changes and new data structure: related to groups, users, resources and passwords.
- Permission system: permission system changes and refactoring (clean up some technical dept with regards to direct permissions or the old and unreleased categories system, etc.)
In addition to this, we’ll do (in this order, iteratively):
- Implement the wireframes in the styleguide (this will be done on the same time as the technical specifications).
- Implement the new API endpoints, and their unit tests.
- Implement the new screens in the application client and the browser plugins.
- Add the corresponding functional test in our test suite.
When can we expect the delivery ?
It looks like a lot of work, but since we follow the SCRUM methodology we’ll split the feature into small and working units. This means that you’ll be able to use a simplified groups feature soon enough. We’ll then deliver the missing components iteratively.
To give you an idea, we have in mind this agenda:

How to give feedbacks ?
You can leave comments directly at the bottom of this article, or using the survey. You can also send us emails at [email protected].
A big thank you to Laura Hilliger for the copywriting review.
Continue reading

2 min. read
Passbolt sails with Docker
Recently we have been working on an updated docker image for passbolt. In this article we wanted to give you a little background around the…
Diego Lendoiro
5 May, 2017
3 min. read
How the community wants the “groups” feature to be
A few weeks ago, we asked for your opinion concerning the design of the groups feature. Thirty seven of you answered to our survey and…
Passbolt team
16 March, 2017